Fibreglass Pool Leaks: Finding, Fixing & Costs
How to tell if your fibreglass pool is leaking or evaporating, where it leaks from, how the bucket test works, and what detection and repair cost.
Written by Tehbyn Nova, Head of Operations & Growth · Technically reviewed by Caleb Druhan, General Manager (QBCC licence 15087383) on
Published
Direct answer
Most fibreglass pool leaks occur in a fitting or buried pipe, not the shell. The shell is a single moulded glass-fibre-and-resin laminate. It has no applied finish or replaceable panels. Water can escape through openings cut into the shell or through nearby buried plumbing.
Confirm the water loss before checking for a leak. In Brisbane, evaporation can cause a pool to lose about 7 mm of water per day in January. A loss of 7 mm per day in June indicates a leak.
Is the fibreglass pool leaking, or is it evaporation?
Some water loss is normal. In Brisbane, pools typically lose about 7 mm of water a day to evaporation in January and about 3 mm a day in June and July. A daily drop of 7 mm may be normal in summer but could indicate a leak in winter.
Check the water level first. In a fibreglass pool, the water should be about one-third to halfway up the skimmer opening. Turn off the auto-filler, mark the waterline, and measure the level again after 24 hours.
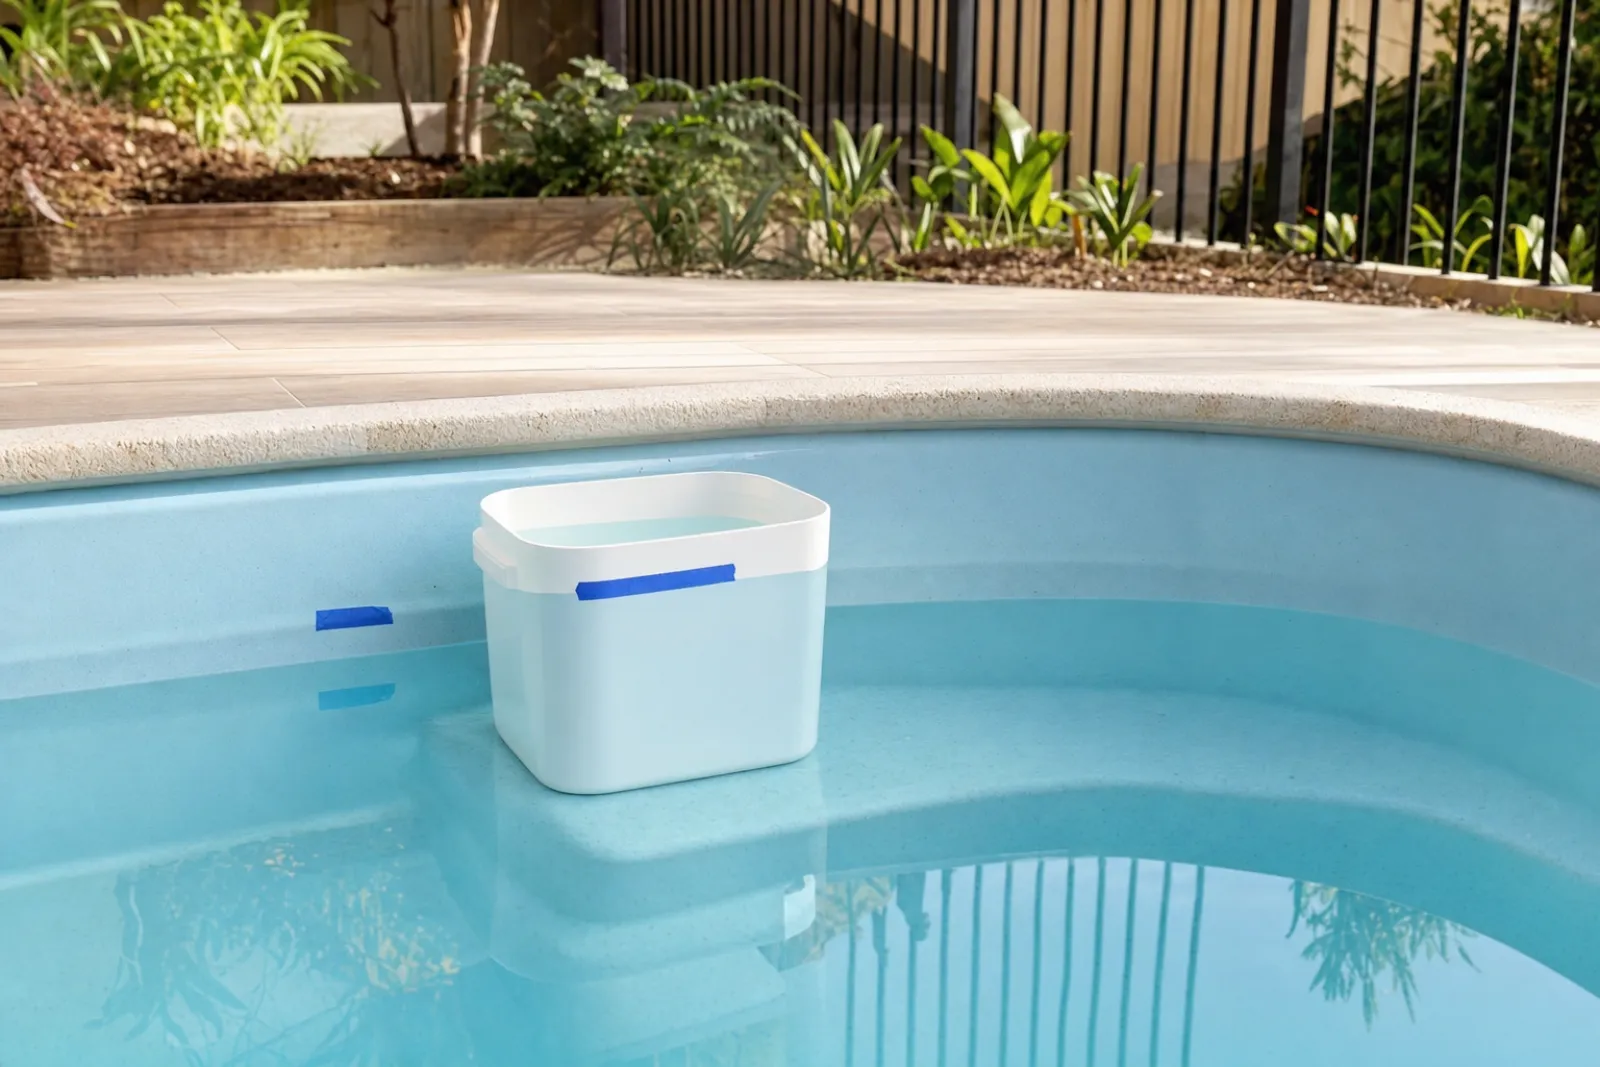
Next, run a bucket test. This compares the pool with a container of pool water exposed to the same weather. Evaporation lowers both water levels by the same amount. If the pool level falls further than the water in the container, the pool may have a leak.
We build fibreglass pools across South East Queensland, so the figures below apply to Brisbane. Two independent sources report similar evaporation rates from October to March. BoM-referenced pool-industry tables published by Daisy Pool Covers report an average of 6.85 mm a day. Pool Advisor's independent Brisbane series reports an average of 6.74 mm a day for the same period.
Daisy reports an overall Brisbane figure of 6.9 mm a day. This equals 221 L a day for a 32.0 m² pool and 286 L a day for a 41.4 m² pool. The full-year average is about 5.3 mm a day.
| Month | Typical evaporation (mm/day) | On a 32 m² pool surface (L/day) |
|---|---|---|
| December – January | 7.2–7.3 | 230–234 |
| February | 6.8 | 218 |
| March | 5.8 | 186 |
| April | 4.6 | 147 |
| May | 3.5 | 112 |
| June – July | 2.9–3.2 | 93–102 |
| August | 4.1 | 131 |
| September | 5.4 | 173 |
| October | 6.4 | 205 |
| November | 7.0 | 224 |
| Annual mean | ~5.3 | ~170 |
The litre values are converted from the published millimetre rates. One millimetre of water over one square metre equals one litre. The calculations use a 32 m² water surface, which is approximately the plan envelope of a 9.0 m × 3.6 m pool. For this surface area:
- 3 mm a day equals 96 L.
- 7 mm a day equals 224 L.
- 10 mm a day equals 320 L.
Use these figures as comparison points, not fixed limits. Typical Brisbane evaporation is about 3 mm a day in midwinter and about 7 mm a day in midsummer. Australian Leak Detection defines normal water loss as 3 mm to 7 mm a day. Compare the measured loss with the expected rate for the month.
A pool cover reduces evaporation by 90% to 95%. A covered pool should lose less water than an uncovered pool. If covering the pool does not reduce the loss, evaporation is unlikely to be the cause.
Rain does not fully offset evaporation in Brisbane. Daisy's figures show that rainfall accounts for no more than 48% of evaporation from October to March, assuming the pool does not overflow. This period averages 11 rain days a month. Rain may reduce water loss temporarily but does not offset the total seasonal evaporation.
Regular top-ups are normal in summer. At 7 mm a day, a 32 m² pool loses 224 L a day. A weekly top-up in January does not necessarily indicate a leak.
Water loss of tens of millimetres a day is not normal evaporation. The highest published daily figure for Brisbane is 7.3 mm in midsummer. Investigate losses that are substantially higher than this level.
How do you run the bucket test on a fibreglass pool?
The bucket test determines whether water loss is caused by evaporation or a leak. Complete these steps:
- Fill a bucket or ice-cream container with pool water to within 50 mm of the top. Using pool water keeps the starting temperature consistent with the pool.
- Stand the container on a step in the pool. This exposes the container to the same water temperature, air temperature, wind, and sunlight as the pool. Do not place the container on the paving because it will evaporate at a different rate.
- Mark both levels. Mark the water level inside the container and the pool waterline on the shell wall or in the skimmer throat. Use tape to record each level.
- Turn the auto-filler off and run the pool normally for 24 hours. The auto-filler must remain off so that it does not replace lost water and affect the result.
- Compare the two drops. If both levels fell by the same amount, the water loss is from evaporation. If the pool level fell more than the container level, the difference indicates the daily loss rate from the leak.
Repeat the test with the pump off for 24 hours. Compare the results from both tests:
- More loss with the pump on indicates a possible leak on the pressure side, where water returns to the pool through the return lines.
- More loss with the pump off indicates a possible leak on the suction side, including the skimmer and main drain lines that draw water toward the pump.
- Equal loss in both tests indicates a possible leak in the shell or its fittings because pump operation does not affect the loss.
Owners should perform only two checks: the bucket test and marking the water level to see whether it holds. If the bucket test confirms water loss beyond evaporation, contact the builder or a leak detection technician.
Where does a fibreglass pool actually leak from?
Check a fibreglass pool for leaks in this order:
- Fittings
- Buried plumbing
- Shell
The shell is a single moulded glass-fibre-and-resin laminate. The gelcoat is sprayed into the mould, followed by the structural glass and resin. The shell is cured before delivery and installed in one piece. It has no render, plaster finish or replaceable panels. Laminate failure is uncommon.
Leaks are more likely where different materials connect. Each fitting requires a hole through the shell, a seal and a pipe connection.
The shell has four standard fittings. The pool light requires an additional penetration.
- The skimmer box. The skimmer removes water from the surface. Its vertical position sets the pool's operating level. It connects to the shell wall and the buried suction line. Leaks can occur at the seal between the box and shell or at the pipe connection.
- The return fittings. Return fittings send filtered water back into the pool. They are on the pressure side of the pump. Each return has a seal and a pipe connection. A damaged return seal may lose more water while the pump is running.
- The main drain in the floor sump. The main drain is a suction fitting in a shallow well at the lowest point of the pool floor. It draws water towards the pump. Leaks at the drain or in its line are on the suction side and appear during a pump-off test.
- The hydrostatic valve. The hydrostatic valve is a one-way pressure-relief valve in the pool floor. It sits high in the same well as the main drain. It allows groundwater into the pool when pressure builds below the shell, which helps prevent the shell from lifting or bulging. It is separate from the main drain and does not empty the pool. Worn seals, debris or valve damage can cause water loss. In older concrete pools, it is a common cause of unexplained water loss.
- The pool light penetration. The pool light is installed through the shell wall and has its own seal. Structural leak testing covers the light, plumbing fittings and any shell cracks.
The next area to check is the pipework buried in the backfill beside the pool. Sand backfill can be difficult to compact fully and may continue to settle after installation. This movement can pull down on pipes connected to the skimmer and returns. The resulting stress can damage pipes and connections. Because settlement occurs gradually, a pool may begin leaking years after installation without visible changes above ground.
Leaks commonly occur at the skimmer, main drain and return fittings. A technician therefore checks the skimmer box and drains first.
Our shells leave the mould with only the standard plumbing holes. Jets, lights and additional features are cut after moulding. We pre-plumb these components at our yard before delivery rather than in the excavation on site. This allows each joint to be inspected before the plumbing is buried and helps prevent leaks and malfunctions.
“We cut and pre-plumb the jets, lights and extra fittings at our yard before the shell leaves. Plumbing a week of pools in one place means a leak gets caught on the ground, not in your backyard.”

How do you find where a fibreglass pool is leaking?
A pool owner can narrow down the source of a fibreglass pool leak without equipment. Complete these checks in order:
- Mark the level and monitor it for 24 hours. Turn off the auto-filler and mark the waterline in the skimmer throat with tape. Measure the drop after 24 hours to determine the loss rate in millimetres.
- Run the bucket test. Compare the water loss in the pool with the water loss from a container of pool water exposed to the same conditions. This determines whether the loss is caused by evaporation or a leak.
- Compare water loss with the pump on and off. Run two 24-hour tests: one with the pump on and one with it off. The results can indicate whether the leak is on the pressure side, the suction side, or in the shell or fittings.
- Inspect the equipment pad. Check for puddles or wet ground around the pump, filter, heater, and valve manifold. Check whether water flows from the backwash line when the filter is not being backwashed. Also check whether air enters the pump basket while the pump is running.
- Inspect the ground and pool shell. Look for damp or sunken soil beside the pool and for dropped coping or paving. Inspect the skimmer throat, return eyeballs, light, and floor fittings for visible cracks or water loss.
If these checks do not locate the leak, contact a technician. A technician can pressure-test each buried pipe and use listening equipment to detect water escaping underground.
Treat a visible hairline crack in the shell as a separate issue. Shell cracks require different diagnosis and repair methods from leaking fittings.
How do you use leak detection dye to find a pool leak?
Leak detection dye is a tool for technicians. With the pump off and the water still, the technician releases purpose-made dye next to a suspected fitting. If the dye moves into a gap, it confirms the leak location. After the repair, the technician repeats the test to confirm that the leak has stopped.
Pool owners should not perform dye testing. The test is used after a technician has narrowed down the likely leak location. The water must be completely still, and an incorrect result can misdirect the search. Do not use food colouring as a substitute for purpose-made leak detection dye.
Do DIY pool leak detection kits and leak detectors work?
Consumer leak detection kits are not something we point owners at. The equipment that actually locates a leak is professional gear. Pressure-test rigs isolate and charge one line at a time. Ground microphones and hydrophones hear water escaping a buried pipe. Pipe-inspection cameras see the failure from inside. A leak inside a buried line or behind a fitting is found with that equipment, which is why the step after the bucket test is a call to a technician rather than a purchase.
The useful DIY step costs nothing. The bucket test, run once with the pump on and once with the pump off, answers the only two questions an owner needs answered. Is the pool losing water beyond evaporation? Which side of the system is driving the loss? A technician arriving with those answers already established spends the call-out locating the leak instead of proving there is one.
How do you tell if the underground pool plumbing is leaking?
Underground pool plumbing leaks usually appear at the pump or in the ground. The signs depend on which side of the pump is leaking.
Suction-side leaks occur between the skimmer and the pump. These pipes are under vacuum while the pump runs. A leak often causes air to collect in the pump basket.
Pressure-side leaks occur after the pump, in the lines that return filtered water to the pool. These leaks release water into the surrounding ground.
Pump-on and pump-off bucket tests can help identify the affected side. Greater water loss with the pump running indicates a pressure-side leak. Greater water loss with the pump off indicates a suction-side leak. Ground conditions can support or contradict the test result.
Check for wet or spongy lawn that remains soft after the rest of the yard dries. Also check for soil near the pool that stays damp between rain, and for paving or coping that has dropped or developed a gap. Note any of these signs before the technician arrives.
Settling backfill is a common cause of buried-line leaks in an otherwise sound pool. As the sand settles, it can pull down the pipes connected to the skimmer and returns until a connection fails.
What does professional pool leak detection involve?
Professional leak detection uses a sequence of methods rather than a single test. A technician selects from six methods.
- Pressure testing each filtration line. The technician isolates and pressurises each pipe separately. This identifies the failed line before opening the ground.
- Ground microphones and hydrophones. Amplified listening equipment detects water escaping from a pressurised buried line or fitting. This helps locate the leak along the pipe.
- Dye at suspected fittings. The technician releases dye near a fitting in still water. Movement of the dye shows whether water is entering a gap.
- Pipe-inspection cameras. A camera inserted into the line identifies failures and blockages inside the pipe.
- Tracer gas. The technician charges a line with hydrogen tracer gas. Escaping gas identifies the failure location.
- Electronic loss meters. A loss meter measures the pool's water-loss rate. This provides a rate the technician can use during testing.
Detection services apply to concrete, fibreglass, and vinyl-liner pools. Structural testing is also available for all three shell types. The testing process does not change for a fibreglass pool, but the likely leak location does. Because a fibreglass shell has no finish to crack, the technician focuses on penetrations and buried lines.
The owner does not need to be present if the technician can access the pool and equipment pad. The technician may complete minor repairs on the same day. Larger repairs require a quote and approval before work begins.
What does pool leak detection cost in Australia?
Australian leak detection firms publish time-based pricing rather than per-leak pricing.
| What is charged | Published figure | Source |
|---|---|---|
| First two hours on site | $798 inc GST | 1300FindLeak |
| Each additional half hour | $168 inc GST | 1300FindLeak |
| Minimum loss rate to be charged | None published | 1300FindLeak |
| No-find-no-fee condition | Pool full, clean and losing at least 10 mm per day | The Leaky Pool Guys, Pipewerx QLD |
The Leaky Pool Guys serves Brisbane, the Sunshine Coast, and the Gold Coast. It provides a no-find-no-fee guarantee when the pool is full, clean, and losing at least 10 mm per day. Pipewerx QLD publishes the same condition.
The 10 mm daily loss rate applies to the guarantee. It is not a minimum detection threshold. A pool losing less than 10 mm per day may still have a detectable leak, but the no-find-no-fee guarantee may not apply.
Other operators use lower loss rates as an indication of a possible leak. Leak Stoppers in Sydney states that most pools lose about 3 mm to 5 mm per day through evaporation. It considers higher loss rates or frequent refilling a possible sign of a leak.
Measure the pool’s daily water loss before booking. This determines which firms may offer a no-find-no-fee guarantee.
How is a leak in a fibreglass pool repaired?
The repair method depends on the location and type of leak.
- Fitting seal: Return fittings, the main drain, and the hydrostatic valve can be serviced. The failed seal is renewed, or the fitting is replaced. The pool shell is not modified.
- Skimmer box: A skimmer can leak at the bond between the box and shell or at the suction-line connection behind it. The repair is completed from the coping side by resealing or rebuilding the failed connection.
- Laminate crack: The damaged area is ground back and rebuilt with resin and glass mat. This restores the required structural thickness. A colour-matched gelcoat is then applied. This work requires a repairer who uses the correct resin system.
- Buried plumbing line: The line is repaired in place or relined. The pool shell is not modified.
Owners should not repair the shell or buried plumbing lines. A laminate repair requires the damaged area to remain dry and stable while the resin cures. The builder must manage the water level. A buried line must first be located using pressure testing and listening equipment.
Owners can perform initial diagnosis, including a bucket test, to help identify the leak type. Further work is fibreglass pool repair performed by the repairer or builder.
We do not lower a customer’s water level to access a fitting or ask an owner to do so. The builder decides whether draining is required and manages groundwater before proceeding.
Can a leaking fibreglass pool be repaired without draining it?
Some small leaks can be repaired while the pool is full. A two-part epoxy putty rated for wet and underwater use can seal a small leak in a fitting or gelcoat. Selleys Knead It Aqua is available from Australian pool retailers in 50 g and 110 g sizes. Its technical data sheet lists fibreglass as a suitable substrate and includes pools, fittings, and emergency in-water repairs as applications. The putty remains workable for about 12 minutes, sets in 20 to 30 minutes, and can be machined or painted after one hour.
The cured putty is hard and inflexible. It is not suitable for joints or cracks that are subject to movement because the crack can reopen behind the repair. It is also not recommended where hydrostatic pressure is present before curing. An underwater patch can stop a leak, but no Australian source identifies it as a permanent repair for a fibreglass shell.
A laminate rebuild, gelcoat re-coat, or work below the shell requires the water level to be managed first. Owners should not drain the pool at any depth. The water acts as ballast that holds the shell in the ground. Without it, the shell can float or bow. Emptying a fibreglass pool is a decision for the builder and requires groundwater control. Owners should not remove a hydrostatic valve or plug to speed up draining.
How is a leaking pool pipe repaired, and can it be done without digging?
A buried pool pipe can often be repaired without excavation by using a trenchless epoxy liner.
The repair process is:
- Clear any blockage with compressed air.
- Inspect the pipe with a camera.
- Clean the inside of the pipe.
- Mix the epoxy resin.
- Insert the resin using dedicated tools.
- Allow the resin to harden.
The hardened resin forms a watertight layer bonded to the inside of the existing pipe. This process does not disturb the concrete, paving, or lawn above the pipe. The pipe must be clear because the liner cannot pass through an obstruction.
Some repairs require excavation. The contractor exposes the pipe, repairs the failed section, and reinstates the surface.
Repairs under concrete or paving cost more than repairs in a garden bed because the surface must be removed, replaced, and matched to the existing area. This reinstatement work is separate from the plumbing repair.
Common causes of pool pipe leaks include:
- Ageing pipe material
- Ground movement that shifts the pipe
- Installation mistakes made when the pipe was laid
Do pool leak sealers actually work?
Poured pool leak sealers can seal small leaks in fittings and rigid pipes. Neither manufacturer states that its product works on fibreglass pool shells.
Lo-Chlor lists concrete, plaster, Diamond Brite, porcelain tile, and other cementitious materials as supported surfaces. It states that the product does not work on vinyl liners. It does not list fibreglass as either supported or excluded. The manufacturer has therefore not confirmed that the product works on a fibreglass gelcoat shell.
Fix-A-Leak lists polyethylene, polybutylene, PVC, copper, black steel, galvanised steel, and improperly sweated joints as supported materials. These are pipes and joints rather than pool shell surfaces. Its Australian distributor, Aquaneo, disclaims responsibility for the product’s performance.
Lo-Chlor reports that repairs last from six months to one year. It also reports that about 90% of leaks seal after one dose, while about 10% require a second dose. The repair is temporary.
| Product | Seals up to | Dose | Cure | Filter handling |
|---|---|---|---|---|
| Fix-A-Leak (Marlig Industries, AU distributor Aquaneo) | Holes up to 3 mm (1/8") in diameter | 1 L per pool up to 83,000 L | 24–48 hours, re-stirred back into suspension every 4–6 hours during circulation | Sand filters set to recirculate; cartridges and DE elements removed from the tank; after sealing a suction leak, leave suction off that line no less than 48 hours |
| Lo-Chlor Leak Sealer | Pools losing up to about 25 mm (one inch) of water per day | 1 quart per 15,000 gallons (US label units) | Works in 24 hours, no need to drain | Cartridges bypassed or removed; sand filters set to recirculate; robotic cleaners taken out of the pool |
The sealer must remain suspended in the water and reach the leak. It must bypass the filter media during treatment. Remove cartridge or DE elements from the tank. Set sand filters to recirculate for the full treatment period. Normal filtration removes the sealer from the water and prevents it from working.
What does it cost to fix a pool leak in Australia?
The repair cost depends on the location and type of leak. These cannot be confirmed until the leak is found. Leak detection is completed and charged separately. The 1300FindLeak rates are the only published Australian figures for detection.
Repair options generally rank by cost as follows:
- Fitting reseal or replacement: Usually the lowest-cost option. It requires component replacement and access labour, without excavation or reinstatement.
- Skimmer box rebuild: Costs more because the work requires access at the coping line and repairs to the surrounding area.
- Laminate and gelcoat repair: Includes the structural repair, colour matching and curing time. The pool cannot be used while this work is completed.
- Buried line repair under paving: Usually the highest-cost option because it includes excavation, plumbing repair and surface reinstatement. A trenchless liner can avoid these additional works.
Selleys Knead It Aqua is available from pool retailers in 50 g and 110 g sizes. The 110 g pack costs around $45. This is the retail cost of putty for a small in-water patch, not the total cost of a repair.
What happens if a pool leak is not fixed?
An unfixed pool leak increases water and chemical use and can damage the ground around the pool. Australian leak detection firms report that an unattended leak can lose thousands of litres each year, sometimes 50,000 litres, which is equivalent to a full pool. Chemicals escape with the water, and replacement water dilutes the remaining sanitiser, stabiliser, and buffer. This makes the pool more difficult and expensive to maintain.
Water escaping below or beside the pool shell can wash fine material out of the bedding sand and backfill. This creates voids that can cause paving to drop and concrete around the pool to crack. Water can also saturate the fill behind a retaining wall and increase pressure on the wall. In South East Queensland, reactive clay soils can swell when wet and shrink when dry. This ground movement can affect the pool structure. Washout under the shell is one of the fibreglass pool problems associated with ground movement.
The water level in a fibreglass pool should remain within the skimmer throat, usually about one-third to halfway up the opening. If a leak lowers the water below the skimmer throat, the skimmer cannot collect surface water. A lower water level also reduces the ballast that helps keep the shell stable in the ground.
Do fibreglass pools leak more or less than concrete and vinyl-liner pools?
Pool types tend to leak in different locations because of their construction. Available information does not establish that one type leaks more often than another.
Concrete, gunite, marcite, and exposed-aggregate pools can leak through cracks in the finish. The finish is applied over the pool structure. It can craze, crack, or fail while the structure remains intact.
Vinyl-liner pools can leak through tears or punctures because the liner provides the waterproof layer.
Fibreglass pools use a single moulded shell. They do not have an applied finish or liner. Leaks generally occur at penetrations in the shell or in the surrounding buried plumbing.
Pool construction also affects which fittings technicians inspect first. In older concrete pools, the hydrostatic valve at the main drain is a common source of unexplained water loss. Worn seals or trapped debris can prevent the valve from sealing on the pool side.
For a fibreglass pool, technicians may inspect the hydrostatic valve, skimmer box, returns, and connected buried lines.
Construction type helps identify likely leak locations. It does not indicate how frequently leaks occur.
FAQs
Is it common for fibreglass pools to leak?
Fibreglass pool leaks usually occur around fittings or in buried plumbing, rather than through the shell. The shell is a single moulded laminate without an applied finish or separate panels.
A technician typically checks these areas first:
- Skimmer box
- Return fittings
- Main drain
- Hydrostatic valve
- Pool light
If these components are not leaking, the technician checks the pipework buried in the backfill beside the pool.
Is it safe to swim in a pool that is leaking?
Yes. A leak does not affect water quality. Swimming safety depends on the pool’s water chemistry.
A leak can damage the pool and the surrounding ground. Do not let the water level fall below the skimmer throat. The water helps keep the pool shell stable in the ground.
Can you have a pool leak and not know about it?
Yes. A small leak can be difficult to distinguish from normal summer evaporation. A Brisbane pool loses about 7 mm of water per day in January. A few additional millimetres may appear to be weather-related evaporation and be replaced during routine top-ups.
Use the bucket test to check for a leak. It compares water loss from the pool with water loss from a container of pool water under the same conditions.
I can't find the leak in my pool. What can I do?
Run the bucket test twice: once with the pump on and once with the pump off.
- More water loss with the pump on indicates a pressure-side leak.
- More water loss with the pump off indicates a suction-side leak.
- Equal water loss in both tests indicates a leak in the pool shell or fittings.
After identifying the likely area, have a technician pressure-test each line.
Do pool leaks ever go away on their own?
No. Pool leaks require repair. Common causes include failed seals, loose fittings, and pipe connections moved out of alignment by settling backfill. These conditions do not correct themselves. Because backfill can continue to settle after installation, related leaks may worsen over time. The leak continues until its cause is identified and repaired.